Make Your Own Mickey Decorations for Baby Nursery
This post is a long time coming. I made 30 pairs of Minnie Mouse ears for my daughter's 2d birthday party back in March. When "designing" the ears, I looked all over the Internet for a adept guide, simply everything I institute was besides complicated or too simple. I wanted something reasonable, merely super cute. And then, as I created my own "design." I detailed my process with pictures planning to share my Minnie Mouse Ears template. Unfortunately, everything else has taken precedence, and I am just at present posting more than iii+ months since I made the ears. Oh well, better tardily than never! I hope you enjoy my guide, and if you make some, please share your pics and/or experiences!

Materials –
- Headbands – look for well-nigh a ane/2 inch wide, any color considering you are going to cover them. I like the flexible, cloth covered Goodie ones because they don't break easily went bent.
- Black Felt – I purchased felt made out of 100% recycled water bottles, inexpensive and eco-friendly! (Don't forget your twoscore% off coupon if shopping at Joann's or Michael's)
- Cream Sheets – I bought the ones with mucilaginous on one side, information technology was helpful. There were two thicknesses at Joann's I bought the thinner ones and doubled upwards. (Once more, use your 40% off coupons for these and purchase a bulk pack because color won't matter.)
- Circle Tracer – I used a circle tracer from Scrapbooking materials I have, but y'all can utilize annihilation that yous desire to trace the right size. Circles approx 3 inches and 3.five inches volition be needed.
- Scissors – abrupt enough to cutting felt smoothly.
- Chalk pencil in white – to trace your shapes on the black felt to be cut out.
- Sharpe marker – to trace your circles on the foam to exist cut out.
- Hot gum gun – LOTS of glue!
- Ribbon – This is for Minnie Mouse bows, so yous can skip if all Mickey Mouse. You will need 1.5 inch pink polka dot ribbon for the bow and a sparse 1/8 inch ribbon to tie information technology on with – preferably in the same colour.
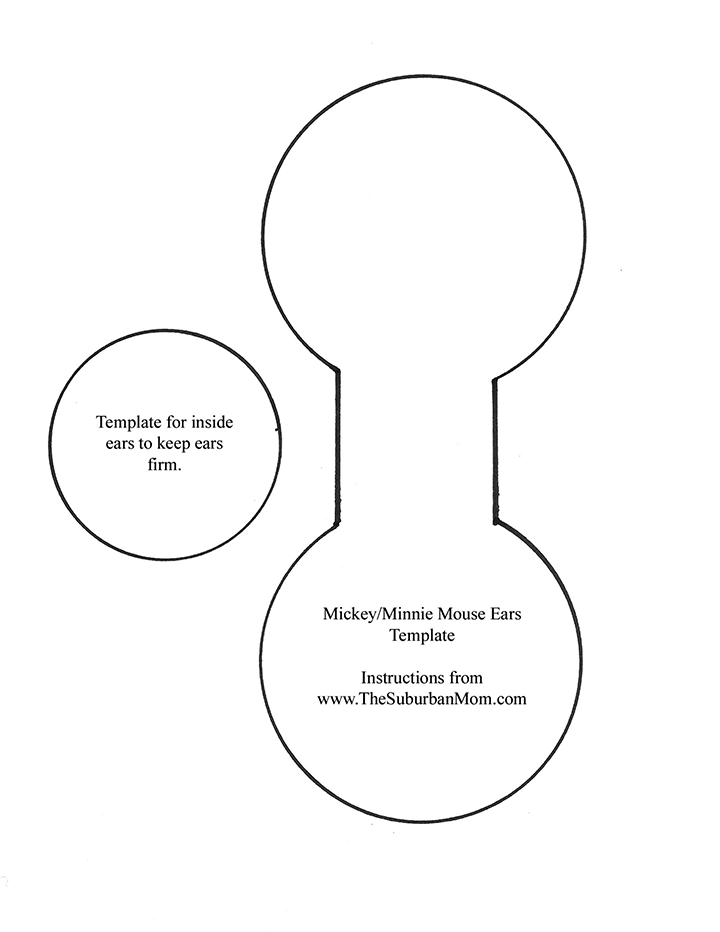
- Template – Download my template for your ears (Adobe PDF File).

How To Make Minnie Mouse Ears
Pace one – Cover the headband – The dimensions used in this stride vary based on the headbands purchased. Y'all will basically need to measure enough felt to be wide enough to wrap the headband and long enough to close on either end. Roughly ii.25 the width of your headband and 1 inch longer then the length.
Since I am always nervous adjoin cut fabric and wasting it, I recommend cutting two strips that y'all think will be the right size. Test one and employ the other as a pattern for the rest of your strips, adjusting bigger or smaller if needed.

To cover your headband, identify a line of hot gum down the center of your strip. Then starting with i end of the headband, rock your headband downwardly the center of the mucilage until yous reach the end (be sure to leave a little extra cloth on either stop of your tip to shut up – about one/2 inch). Remember, when working with hot glue, you desire to press with your finger as you get so y'all don't end upwards with lumps.

Adjacent, bring ane side effectually and seal with another line of glue down the edge. Finally, wrap the other side around and mucilage downwardly. Note – in that location volition be lots of bumps and lumps, once cool, you will desire to go back and fill in with little squirts of glue to seal flat. For the ends, put a little dot of mucilage in each end and pressed closed with my fingers. Once absurd, cut off whatever extra fabric.
Step 2 – Cut foam circles – The cream circles will stiffen your felt ears then they stand up dainty and firm on their own. Since you volition totally cover your foam, any color works. I made my mouse ears iii.five inches in bore. This size works well for toddlers – adults, but you can suit if you like. You will need 4 cream circles for each pair of ears – remembered I doubled my thin foam to make stiffer. The foam circles will be three inches in diameter.

When cutting out your foam circles, it is not necessary to be exactly precise. As you can see from my pictures, my cream circles are not pretty – jagged and y'all can run into the Sharpe marks. It won't thing because they will totally be covered.
If y'all purchased the sparse foam with adhesive, become ahead and stick your foam circles together in pairs.

Step 3 – Cut your felt ears – When creating your felt ears, you lot will create two circles joined together by a small rectangle (see picture). The purpose of this shape is to wrap the ears onto the headband. The circles volition each be three.v inches in diameter. The size of the rectangle between the circles depends on your headband, the rectangle should exist approx double the width of your headband (already wrapped in felt). Once again, cut a pair to test and arrange appropriately.

Cutting perfect circles is not an easy job. I did my best to make them wait nice and circular, but I didn't kill myself making perfect circles. Remind yourself that these are handmade, and people volition be impressed with that. Plus once they are on, you won't see tiny imperfections in your circles 🙂
Step 4 – Create your ears – In one case you take everything cut out, it is fourth dimension to gather your ears. (Note, cut is the longest procedure, I cut all my pieces out over several days because if you lot are making 30 similar I did, your hand will go tired!)
Starting with a foam circle (doubled), use the sticky side to attach to the eye of i side of the felt ears. Next squirt a generous amount of hot glue all over the meridian of the foam circle and fold the other side on superlative. Once again, squish equally flat as you tin. Note, in order to avoid large lumps you want really hot gum, aye, y'all will burn your fingers a bit 🙂 Deplorable.
Become ahead and glue all of your ears. Be certain to leave the rectangle area unsealed (for at present).
After your ears have cooled, go back and run a thin line of glue on the within border of each ear to seal. Again, not on the edge with the folded rectangle.

Pace 5 – Assembly – Now information technology is fourth dimension to put your ears on the headbands. Slide your headband through the loop created by the rectangles at the bottom of each ear. In one case y'all determine where you want your ears, squirt gum into loops securing ears to headband. (I attached mine a little less than 2 inches apart – this is rough because I did each pair to wait.) Every bit you are securing your ears, be sure to pinch the ears down firmly to the eye of the band. Add as much glue equally needed to seal.
Step 6 – Minnie Bows – To create your bows, cutting a length of ribbon approx nine inches long. Fold the two ends dorsum until they over lap in the center, and so pinch all 3 layers at the center. This creates the wait of Minnie's bow. Side by side take the thin ribbon (in matching color) and tie effectually the compression at the eye. Vola, a bow! Side by side wrap the thin ribbon effectually the top and bottom of the headband and necktie off. Then gum the ribbon flaps down, and employ a squirt of hot clue backside the bow to secure.

That's it. Minnie Mouse bows in just 6 steps. This pattern could be modified to make carry ears, dog ears, etc. The hardest function about the project is cut straight felt circles and working through each time-consuming step – if making multiples. Good luck!
If yous are having a Minnie Mouse (or Mickey Mouse) birthday party and want more ideas for party decor, bank check out my other post with details well-nigh all of the other fun decorations for a Minnie Mouse Birthday Party.

DIY Minnie Mickey Mouse Ears Video Tutorial
For even more tips, bank check out my video tutorial that will walk you lot step by pace through the whole process.
Make Your Own Mickey Decorations for Baby Nursery
Source: https://www.thesuburbanmom.com/2010/06/16/how-to-make-mickey-minnie-mouse-ears-for-a-party/
0 Response to "Make Your Own Mickey Decorations for Baby Nursery"
Post a Comment